Introduction
Many homeowners and landscapers struggle with compacted soil that prevents water, air, and nutrients from reaching grass roots. Lawn aeration—the process of creating small holes in the soil—directly addresses this problem by relieving compaction and opening pathways for essential resources to penetrate deeper into the root zone.
Results vary widely depending on how you approach the job. This guide covers what's required, the exact steps, and the mistakes that undermine even well-intentioned efforts — with close attention to four variables that determine whether aeration actually works:
- Timing — aerating at the right point in the growing season
- Technique — depth, spacing, and pattern of penetration
- Soil conditions — moisture level before and after
- Tool quality — tine strength, handle durability, and fork design
Key Takeaways
- Garden fork aeration (spike aeration) relieves surface compaction by creating holes every 4–6 inches across the lawn
- Best performed in early fall or spring when soil is slightly moist but not waterlogged
- Most effective for small-to-medium lawns with moderate compaction
- Pair with post-aeration overseeding and fertilization for maximum results
- Proper tine depth (at least 3 inches) and consistent spacing determine whether aeration actually improves turf health
What You Need to Aerate Your Lawn With a Garden Fork
Gathering the right tools and checking soil conditions before you start directly affects how effective your aeration will be. Skipping prep leads to poor tine penetration and wasted effort.
Equipment
The garden fork is your primary tool. Look for one with:
- Sturdy, straight tines (4–5 tines for general use; 10 tines for finer spacing)
- Long handle for leverage (48–54 inches)
- Durable construction with forged steel heads and hardwood handles
Wolverine Tools builds their garden forks with forged steel heads, North American Ash hardwood handles, and riveted connections — construction that holds up to the repetitive physical demands of aeration. All tools carry a lifetime warranty against manufacturer defects.
Soil and Lawn Readiness
Soil should be lightly moist—not dry and hard, not waterlogged.
The Screwdriver Test: Push a screwdriver into the ground. If it enters with moderate resistance and reaches 4–6 inches deep, the soil is ready. If it bounces back, water the lawn first. If soil sticks to the screwdriver or your shoes, it's too wet—wait 1–2 days.
Optional Supplies
- Lawn marking flags or string to track rows and ensure complete coverage
- Garden rake for loosening surface debris before starting
- Topdressing materials (compost, sand) for post-aeration application
How to Aerate Your Lawn With a Garden Fork
Garden fork aeration is manual work, but a consistent technique makes the difference between full coverage and spotty results. These steps walk through the process from prep to post-treatment.
Step 1: Mow and Clear the Lawn
Mow the lawn to its normal height—avoid scalping. Remove any debris (sticks, stones, thick thatch buildup) that would obstruct fork penetration. Mark or flag underground irrigation lines, shallow cables, or sprinkler heads to avoid damage.
Step 2: Water the Lawn (If Needed)
If the soil is dry, water the lawn 1–2 days before aerating so tines penetrate cleanly without sliding or smearing.
Caution: Never aerate immediately after heavy rain. Waterlogged soil causes tines to slide and can compact soil further when pressed, creating smearing that seals macropores and worsens the problem.
Step 3: Insert the Fork and Rock to Open the Holes
Push tines straight down into the soil, applying firm downward foot pressure on the shoulder of the fork to reach a depth of 3–4 inches minimum; 5–6 inches is ideal for compacted clay soil.
Once fully inserted, gently rock the fork back and forth (front-to-back) to open the holes wider and break up compaction beneath the surface. Then pull straight out without twisting to keep holes clean.
Why depth matters: Shallow holes under 2 inches fail to reach the root zone where compaction relief is most needed, making any benefits short-lived.
Step 4: Work in a Grid or Row Pattern
Move forward in straight rows, re-inserting the fork every 4–6 inches to ensure thorough coverage.
For severely compacted areas:
- High-traffic zones
- Areas under garden furniture
- Pathways and edges
Make a second pass at a perpendicular angle to the first for deeper relief.
Step 5: Post-Aeration Treatment
After aerating, apply:
- Compost topdressing (¼ to ½ inch layer)
- Overseeding for bare or thin spots
- Lawn fertilizer for nutrient boost
The open holes allow these inputs to reach root depth more effectively than surface application alone. Water the lawn lightly after applying any treatments to help nutrients and seed settle into the holes.
When Should You Aerate Your Lawn With a Garden Fork?
Get the timing wrong and aeration adds stress instead of relieving it. Matching your grass type to the right seasonal window is what determines whether your lawn bounces back fast or struggles.
Best Season and Conditions
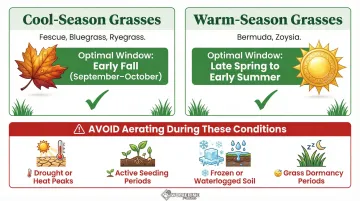
Cool-season grasses (fescue, bluegrass, ryegrass):
- Early fall (September–October) is the optimal window
- Grass recovers quickly from tine punctures during active fall growth
- Cooler temperatures and fall moisture support rapid healing
Warm-season grasses (Bermuda, zoysia):
- Late spring to early summer is the target window
- Aerate when grass is vigorously growing, not during dormancy
When to Avoid
Never aerate during:
- Drought stress or summer heat peaks
- Active seeding periods (disrupts germination)
- Frozen or waterlogged soil conditions
- Dormancy periods
Aerating during drought or peak heat allows exposed soil to dry out faster, increasing turf stress rather than relieving it. Once you've confirmed the timing is right, the next step is getting your technique down.
Key Variables That Affect Aeration Results
Technique alone doesn't guarantee results. Four key variables determine how effective garden fork aeration is.
Tine Insertion Depth
Shallow holes (under 2 inches) do little to relieve compaction at the root zone. The target is 3–6 inches depending on soil type.
Reaching this depth consistently depends on:
- Soil moisture level
- Fork tine length and quality
- Applied body weight and leverage
Spacing and Coverage Pattern
Holes spaced too far apart (8+ inches) leave most of the lawn compacted.
| Zone | Recommended Spacing |
|---|---|
| Standard lawn | 4–6 inches between insertions |
| High-traffic areas | 3–4 inches for tighter coverage |
Soil Type
Different soil textures respond uniquely to spike aeration:
| Soil Type | Compaction Characteristics | Post-Aeration Amendment |
|---|---|---|
| Clay | Holds compaction longer; requires more aeration effort | Compost (¼ to ½ inch) to improve pore space and drainage |
| Loam | Moderate compaction; responds well to annual aeration | Compost or balanced fertilizer |
| Sandy | Drains freely; low compaction risk | Compost to increase water and nutrient retention |
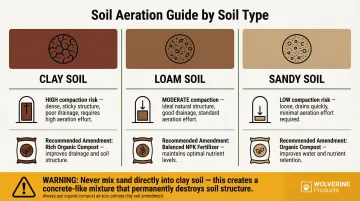
Important: Never add sand to clay soil—it creates a concrete-like mixture. Only use sand as topdressing if the native soil is already sandy.
Frequency of Aeration
Underaerating (once every 3–4 years) provides minimal long-term benefit.
General guidelines:
- Most lawns: Annual aeration
- High-traffic or clay-heavy lawns: Twice yearly (spring and fall)
- Sandy, well-draining lawns: Every 2 years
Because spike aeration provides only temporary relief compared to core aeration, high-traffic areas may need more frequent treatment to maintain results.
Common Mistakes When Aerating With a Garden Fork
Most failed aeration attempts come down to the same handful of errors — and each one is easy to avoid once you know what to watch for.
Aerating Dry or Oversaturated Soil
Dry soil: Fork bounces off the surface instead of penetrating Oversaturated soil: Creates smearing and further compaction around holes
Reinforce the moisture-test check from the prep section as a non-negotiable first step. The screwdriver test takes 30 seconds and prevents wasted effort.
Inconsistent Depth and Spacing
Many DIYers apply light pressure inconsistently, resulting in holes at 1–2 inches rather than 4–6 inches.
Solution:
- Apply full body weight on the fork shoulder
- Follow a visible grid pattern (use string or flags)
- Check depth periodically by measuring a few holes
Skipping the grid pattern leaves dense compacted patches untreated, undermining the entire effort.
Skipping Post-Aeration Treatment
Aeration creates the ideal window to overseed, topdress, or fertilize. Without follow-up treatment, holes close gradually through settling and foot traffic — and the nutrient and seed uptake benefit is lost entirely. Take advantage of the open window by applying at least one of the following:
- Overseeding — seeds reach the soil directly through open channels
- Topdressing — compost or sand fills holes and improves soil structure
- Fertilizing — nutrients penetrate deeper with less runoff
Alternatives to Garden Fork Aeration
Garden fork aeration is effective for small-to-medium lawns but is not always the most practical choice. Scale, compaction severity, and professional context determine which method makes more sense.
Hollow Tine (Plug) Aerator
Unlike a garden fork (spike aeration), a plug aerator removes a core of soil, which more thoroughly relieves compaction and removes thatch.
Key differences:
| Feature | Garden Fork (Spike) | Plug Aerator |
|---------|---------------------|--------------|
| Mechanism | Pushes soil aside | Removes soil cores |
| Compaction relief | Temporary; can increase lateral compaction | Long-lasting; creates open channels |
| Surface disruption | Minimal | High; leaves plugs on surface |
| Best use case | Small lawns, spot treatments | Large lawns, severe compaction |
Professional landscapers prefer plug aeration for large-scale lawn restoration projects where long-term compaction relief outweighs the extra cleanup.
Mechanical / Powered Aerators
Walk-behind or tow-behind mechanical aerators are the go-to for lawns over 5,000 square feet where manual forking becomes impractical.
They cover ground faster with consistent depth, but come with higher equipment costs, storage requirements, and ongoing maintenance. For lawns under 2,000 square feet, the cost and effort rarely justify the equipment — a quality garden fork handles the job more efficiently at that scale.
Frequently Asked Questions
Frequently Asked Questions
Can you aerate with a garden fork?
Yes, a garden fork works for lawn aeration (spike aeration). The holes it creates relieve surface compaction and improve water and nutrient infiltration. It works best on smaller lawns and is less aggressive than core or plug aeration.
Is there a downside to aerating?
Spike aeration from a garden fork can temporarily displace soil sideways, adding minor surface compaction around each hole. Fork aeration is labor-intensive for large areas, and aerating at the wrong time or in the wrong conditions can stress the lawn rather than help it.
How deep should you push a garden fork when aerating?
Aim for 3–4 inches minimum, with 5–6 inches ideal for compacted clay soil. Depth depends on soil moisture—slightly moist soil allows the deepest, cleanest penetration.
How often should you aerate your lawn?
Most lawns benefit from annual aeration. Heavy-traffic areas or clay-heavy soils may benefit from aerating twice a year. Lawns with sandy, well-draining soil may only need it every 2 years.
When is the best time of year to aerate your lawn with a garden fork?
Early fall is ideal for cool-season grasses; late spring to early summer for warm-season grasses. Both timing windows coincide with active growth periods, giving the lawn the best chance to recover quickly.