Introduction: What Is Trenching and Why Does It Matter?
Trenching is the process of digging narrow, deep channels into the ground to accommodate pipes, cables, drainage systems, and other underground infrastructure. It's a core skill for construction, landscaping, irrigation, and utility work—yet choosing the wrong trenching tool or technique leads to project delays, safety hazards, and costly rework.
The stakes are real: 39 workers died in trench collapses in 2022, a 60% spike from the prior year. Meanwhile, nearly 200,000 utility strikes occurred in 2024 because contractors skipped locate protocols or used the wrong equipment.
This guide covers everything professionals need to know—tool types, selection criteria, step-by-step technique, safety rules, and cost expectations. Whether you're installing a residential sprinkler system or running a commercial water main, you'll find the right tool for your project scale, soil type, and trench dimensions.
TLDR
- Tool choice depends on project scale, soil type, and trench dimensions
- Tools range from hand spades and drain spades to chain trenchers, rockwheels, and vibratory plows
- OSHA soil classification (Type A, B, or C) drives equipment selection—sandy, clay, and rocky conditions each demand different tools
- Call 811 before digging; OSHA requires protective systems for any trench deeper than five feet
- Professional-grade hand tools remain essential for precision work, cleanup, and backfilling on every job site regardless of machine use
Types of Trenching Tools: From Hand Tools to Heavy Equipment
Trenching tools fall into two broad categories: hand tools and mechanical equipment. The right choice depends on job scale, access constraints, and soil conditions — and most professional crews rely on both.
Hand Tools for Trenching
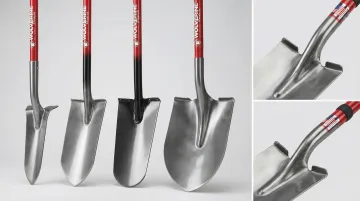
Core hand tools used in trenching include contractor shovels (pointed and flat spades), drain spades, mattocks, grub hoes, and picks. Each serves a specific purpose:
- Pointed spades break into compacted soil and penetrate hard ground
- Flat spades square trench walls and remove loose material cleanly
- Drain spades feature wide (14-inch) blades for efficient soil removal in narrow trenches
- Mattocks and picks break through rocky or root-dense terrain
Tool quality matters more than most contractors expect until a blade cracks mid-job. Wolverine Tools' contractor-grade shovels use 14-gauge heat-treated chromoly steel blades and Northern Ash hardwood or fiberglass handles with solid reinforcing cores. Two-rivet head attachments and forward-turned steps add leverage and hold up under the repeated stress of daily professional digging.
When to choose hand tools as primary equipment:
- Small-scale landscaping trenches and irrigation line installation
- Tight spaces near structures, fences, or tree roots
- Precision depth control requirements
- Situations requiring minimal ground disturbance
- Short runs under 50 linear feet where machine setup isn't justified
Mechanical Trenching Equipment
Chain Trenchers
Chain trenchers use a rotating boom with a chainsaw-style chain and carbide teeth to cut through soil. An auger or conveyor moves spoil to the trench edge as it cuts. Ride-on models like the Ditch Witch RT45 reach up to 165 feet per hour in mixed soil conditions.
| Equipment Class | Typical Depth | Typical Width | Ideal Use Cases |
|---|---|---|---|
| Walk-Behind Chain Trencher | 24"–48" | 4"–6" | Light-duty gas lines, residential irrigation, low-voltage electrical |
| Ride-On Chain Trencher | 48"–60"+ | 6"–12" | Heavy-duty utility installation, long-run pipeline distribution |
Rockwheel Trenchers
Rockwheel trenchers use a rotary cutting wheel with carbide bits for high-RPM chipping through rock, concrete, and asphalt. Unlike chain trenchers that stall in hard rock formations, rockwheels pulverize hardpan and solid rock into usable backfill. The Vermeer T655III center mount rockwheel cuts up to 48 inches deep and 10 to 25.4 inches wide.
Additional Mechanical Options
- Mini excavators and skid-steer loaders with trencher attachments: Ideal for residential and tight-access jobs; Bobcat's LT414 attachment achieves dig depths up to 62 inches with hydraulic side-shift capabilities
- Vibratory plows: Install cable and pipe up to 24 inches deep with minimal surface disruption, eliminating backfilling and turf restoration costs
- Micro trenchers: Cut narrow slots (0.5" to 2.25" wide, 8" to 17" deep) directly into asphalt or concrete for urban fiber optic and telecom installations
Matching the Right Trenching Tool to Your Project
Project Scale Determines Equipment Class
Linear footage, trench depth, and width requirements drive your equipment decision:
- Small scale (under 100 linear feet, 12"–24" deep): Walk-behind trenchers or hand tools
- Medium scale (100–500 feet, 24"–48" deep): Walk-behind or compact ride-on trenchers
- Large scale (500+ feet, 48"+ deep): Heavy-duty ride-on trenchers or excavators

Over-sizing equipment wastes money and can damage site aesthetics—critical for landscape professionals working on residential properties.
Soil Type Drives Tool Selection
OSHA classifies soils into three categories based on unconfined compressive strength, and each demands different equipment:
Type A Soils (cohesive clay, silty clay, 1.5+ tons/sq ft):
- Chain trenchers with standard cup teeth
- Hand tools with tempered steel blades
Type B Soils (angular gravel, silt, 0.5–1.5 tons/sq ft):
- Chain or wheel trenchers
- Shark teeth for medium-density conditions
Type C Soils (sand, gravel, submerged soil, <0.5 tons/sq ft):
- Wheel trenchers for stability
- Requires most protective systems during excavation
Rocky or Frozen Terrain:
- Rockwheel trenchers with carbide bits
- Alligator teeth for chain trenchers (rotating design for even wear)
Trench Dimensions and Buy vs. Rent Decisions
Once you've identified soil type and scale, required depth and width confirm which equipment class fits. For one-off projects, renting a walk-behind or ride-on trencher is usually the practical call. Contractors running frequent jobs should evaluate ownership — and factor in whether hand tools can handle the access points machines can't reach.
Access and Site Constraints
Not every site accommodates powered equipment. Consider these constraints before committing to a machine:
- Tight residential spaces near buildings or fencing may require compact walk-behinds
- Root-dense areas demand more horsepower — or a switch to hand tools to avoid root damage
- Narrow corridors and enclosed beds are often only reachable with a spade or trenching tool
Trenching Techniques: A Step-by-Step Field Guide
Step 1: Pre-Dig Planning and Utility Locating
Call 811 before any digging to identify buried utilities—this is federally mandated and prevents the 196,977 utility damages reported in 2024. Failure to notify 811 remains the top root cause of utility strikes, accounting for approximately 18% of all damages.
Lay out your trench route with stakes and string line, then verify local code requirements for minimum depth by utility type:
- Irrigation laterals: 6–8 inches
- Irrigation mains: 10–12 inches (residential), 18–24 inches (commercial)
- Natural gas mains: 24 inches minimum cover
- Water supply lines: 6 inches below local frost line (consult NOAA frost-depth maps)
- PVC electrical conduit: 18 inches minimum cover per NEC Table 300.5
Step 2: Setting Up the Trench
Prepare the work area before the first cut:
- Remove surface vegetation or sod along the trench line
- Score the trench line with a spade or scoring tool to define the cut
- Set spoil piles on one side only—keep the opposite side clear for workers and equipment
- Maintain at least 2 feet of clearance from the trench edge to prevent material from rolling back
Step 3: Executing the Dig
Mechanical trenching: Set boom angle or cutting depth before starting, move at a steady controlled pace, and avoid over-stressing equipment in hard soils. Match cutting teeth to soil conditions:
- Cup teeth — soft soils
- Shark teeth — hard or rocky terrain
- Alligator teeth — solid rock
Hand tool trenching: Use a pointed spade to break the line and penetrate compacted soil, follow with a drain spade to remove soil cleanly, and work in consistent depth intervals. For long runs, look for tools with heat-treated chromoly steel blades, closed-back designs, and forward-turned steps—features like Wolverine's 14-gauge chromoly trenching shovels that reduce fatigue without sacrificing cut depth.
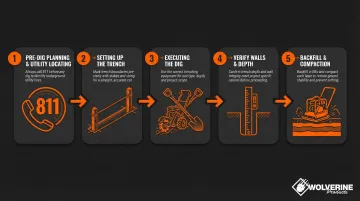
Step 4: Trench Walls and Depth Verification
Once you've reached target depth, confirm the trench is ready for pipe or conduit:
- Square trench walls using a flat spade or shovel
- Verify consistent depth with a measuring rod at multiple points
- Watch for wall instability: cracking, moisture seepage, or loose soil are all stop-work indicators
Any trench 5 feet or deeper requires a protective system (shoring, sloping, or trench box) under OSHA regulations.
Step 5: Backfilling and Compaction
Place and compact fill in layers rather than dumping all at once. Use native soil when appropriate, and compact each layer to prevent settling. A flat spade or tamping bar is the hand tool of choice for smaller jobs; for larger projects, use dedicated dirt tamps with 8" x 8" or 10" x 10" heads to ensure proper compaction.
Trench Safety: Rules Every Contractor Must Follow
The OSHA 5-Foot Rule and Protective Systems
OSHA 29 CFR 1926.652(a)(1) requires that any trench 5 feet or deeper must be protected by an adequate protective system—trench box/shield, shoring, or sloping/benching—unless excavated entirely in stable rock.
The 5-4-3-2-1 Trench Safety Mnemonic
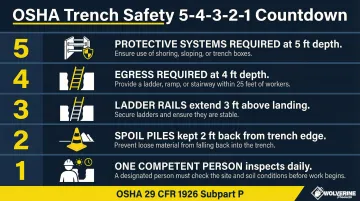
These five numbers expand directly on those OSHA 29 CFR 1926 Subpart P requirements, giving crews a fast, field-ready reference:
- 5 Feet: Protective systems required for all trenches 5 feet or deeper
- 4 Feet: A ladder, ramp, or stairs required in trenches 4 feet or deeper — positioned within 25 lateral feet of every worker
- 3 Feet: Ladder side rails must extend at least 3 feet above the upper landing surface
- 2 Feet: Keep all spoil piles and equipment at least 2 feet back from trench edges
- 1 Person: One designated Competent Person must inspect the site before work begins each day
Soil Classification and Daily Inspections
OSHA soil classifications dictate required protection levels for any excavation:
- Type A (clay-based, cohesive) — lowest risk, most stable
- Type B (fissured, previously disturbed) — moderate risk
- Type C (sandy, granular, or submerged) — highest risk, most protection required
A competent person must be on site to classify soil and authorize excavation. Daily inspections are required before work begins and after any rainfall or event that increases hazard.
Understanding Trenching Costs: What Contractors and Clients Should Know
Primary Cost Drivers
Several factors drive trenching costs on any job site:
- Soil type and conditions (clay, rock, root-heavy ground)
- Trench depth and total linear footage
- Equipment requirements and operator labor
- Permit fees and municipal requirements
- Backfill and surface restoration
Cost per linear foot varies widely by project type — see the breakdown below.
| Project Type | Average Cost per Linear Foot | Key Cost Drivers |
|---|---|---|
| General Trenching | $5–$12 | Equipment rental, labor rates, soil type |
| Underground Electrical | $6–$14 | Conduit material (PVC vs. steel), licensed electrician labor |
| Water Lines | $30–$50 | Depth (frost line compliance), pipe material (copper vs. PEX) |
| Sewer Lines | $40–$180 | Deep excavation, municipal permits, heavy equipment |
Machine vs. Hand Trenching Economics
Hand digging yields approximately 10 feet per hour, while a dedicated ride-on chain trencher achieves 165 feet per hour in mixed soil. Machine rentals incur upfront costs ($200–$300 per day), but the productivity gap makes machine trenching the clear choice for runs exceeding 50 linear feet.
Water Line Trenching Costs
Water line work sits at the higher end of that cost range precisely because depth requirements are non-negotiable. Frost line compliance, local soil conditions, pipe material (copper vs. PEX), and permit fees ($500–$2,000) all push costs up. Hiring a licensed contractor adds expense but ensures proper installation depth — skipping that step risks catastrophic freeze damage once winter hits.
Frequently Asked Questions
What equipment is used to dig a trench?
Hand tools (shovels, spades, mattocks) handle small-scale and precision work, while mechanical equipment—chain trenchers, wheel trenchers, mini excavators, skid-steer attachments, and vibratory plows—tackle larger jobs requiring speed and consistent depth.
What equipment is best for digging a water line?
Chain trenchers and ride-on trenchers are most common for water line installation due to their ability to dig consistent depth over long runs. Mini excavators work well in tighter spaces, and hand tools handle short runs or finish work near structures.
How much does it cost per foot to dig a water line?
Cost per linear foot varies based on soil conditions, depth, location, and equipment used. Industry averages range from $30 to $50 per foot for residential water lines, with frost-line depth and local permit fees being the two biggest variables.
What is the 5-4-3-2-1 trench rule?
This OSHA safety mnemonic covers five trench protection thresholds: 5 ft triggers required protective systems, 4 ft requires egress access, 3 ft sets the ladder extension above the landing, 2 ft is the spoil pile setback distance, and 1 refers to the competent person required for inspection.
When should you use hand tools instead of a trenching machine?
Hand tools are preferred for short runs under 50 feet, tight spaces near structures or roots, precision depth work, and any area where a machine would cause excessive site damage or can't reach.
How deep should a trench be for irrigation or utility lines?
Depth requirements vary by utility type: irrigation laterals typically need 6–8 inches, water supply lines must clear the local frost line by 6 inches, and PVC electrical conduit requires 18 inches minimum cover per NEC Table 300.5. Always confirm requirements with local code before digging.